Nesse tutorial você aprenderá como criar uma ListView Editável (Editable ListView VBA), onde você poderá editar os dados diretamente dentro do Controle ListView e salvar as alterações automaticamente, de dentro do ListView VBA para dentro de sua planilha do Excel.

Habilitar Listview
Para isso, devemos primeiro preparar nosso ListView. Caso tenha dúvidas em como fazer isso, veja o post ListView VBA – Uso e Aplicação do Controle ListView VBA, ensinando o passo-a-passo de como criar um ListView Personalizado para Controle de Estoque.
Visualizar ListView
Uma vez inserido o UserForm, o Controle ListView e o Controle ImageList à sua aplicação. Copie o código abaixo e cole dentro do seu projeto. Finalizada essa etapa, seu controle ListView já estará pronto para a próxima etapa, que será tornar os subitems do seu ListView editáveis.
Sub CriaCabecalho()

Dim wbk     As Workbook
Dim ptCor   As Variant
Dim cmf As String
Set wbk = Workbooks("ListView-Editavel.xlsm")

ptCor = RGB(69, 39, 255)

ListView1.ForeColor = ptCor

With Me.ImageList1.ListImages

      .Add , "img1", LoadPicture(wbk.Path & "\lvIcons\amarelo.jpg")     '1
      .Add , "img2", LoadPicture(wbk.Path & "\lvIcons\verde.jpg")       '2
      .Add , "img3", LoadPicture(wbk.Path & "\lvIcons\azul.jpg")        '3
      .Add , "img4", LoadPicture(wbk.Path & "\lvIcons\vermelho.jpg")    '4

End With

With ListView1
    .ColumnHeaders.Clear
    .View = lvwReport
    .SmallIcons = ImageList1
    .FullRowSelect = True
    .Gridlines = True
    .ColumnHeaders.Add , , "Id", 0                          '0
    .ColumnHeaders.Add , , "C.Barras", 100, 2               '1
    .ColumnHeaders.Add , , "Descrição do Produto", 280      '2
    .ColumnHeaders.Add , , "Grupo", 140, 2                  '3
    .ColumnHeaders.Add , , "Marca", 140, 2                  '4
    .ColumnHeaders.Add , , "Linha", 140, 2                  '5
    .ColumnHeaders.Add , , "Categoria", 140, 2              '6

End With

End Sub

Sub TrazDados()

Dim lvItem      As ListItem
Dim Wplan       As Worksheet
Dim lin         As Integer

Set Wplan = Planilha1
lin = 2

ListView1.ListItems.Clear

Wplan.Activate

With Wplan

        While .Cells(lin, 1).Value <> ""

                With ListView1

                    Set lvItem = ListView1.ListItems.Add(, , Format(Wplan.Cells(lin, "A").Value, "0000"),,1)

                        If Wplan.Cells(lin, "B").Value = "SEM GTIN" Then
                            lvItem.ListSubItems.Add , , Wplan.Cells(lin, "B").Value, 4
                        Else
                            lvItem.ListSubItems.Add , , Wplan.Cells(lin, "B").Value, 2
                        End If

                        lvItem.ListSubItems.Add , , Wplan.Cells(lin, "C").Value, 3

                        If Wplan.Cells(lin, "D").Value <> "" Then
                            lvItem.ListSubItems.Add , , Wplan.Cells(lin, "D").Value, 2
                        Else
                            lvItem.ListSubItems.Add , , Wplan.Cells(lin, "D").Value, 4
                        End If

                        If Wplan.Cells(lin, "E").Value <> "" Then
                            lvItem.ListSubItems.Add , , Wplan.Cells(lin, "E").Value, 2
                        Else
                            lvItem.ListSubItems.Add , , Wplan.Cells(lin, "E").Value, 4
                        End If

                        If Wplan.Cells(lin, "F").Value <> "" Then
                            lvItem.ListSubItems.Add , , Wplan.Cells(lin, "F").Value, 2
                        Else
                            lvItem.ListSubItems.Add , , Wplan.Cells(lin, "F").Value, 4
                        End If

                        If Wplan.Cells(lin, "G").Value <> "" Then
                            lvItem.ListSubItems.Add , , Wplan.Cells(lin, "G").Value, 2
                        Else
                            lvItem.ListSubItems.Add , , Wplan.Cells(lin, "G").Value, 4
                        End If


                End With

            lin = lin + 1

        Wend
End With

End Sub

Private Sub UserForm_Initialize()

    Call CriaCabecalho
    Call TrazDados

End Sub
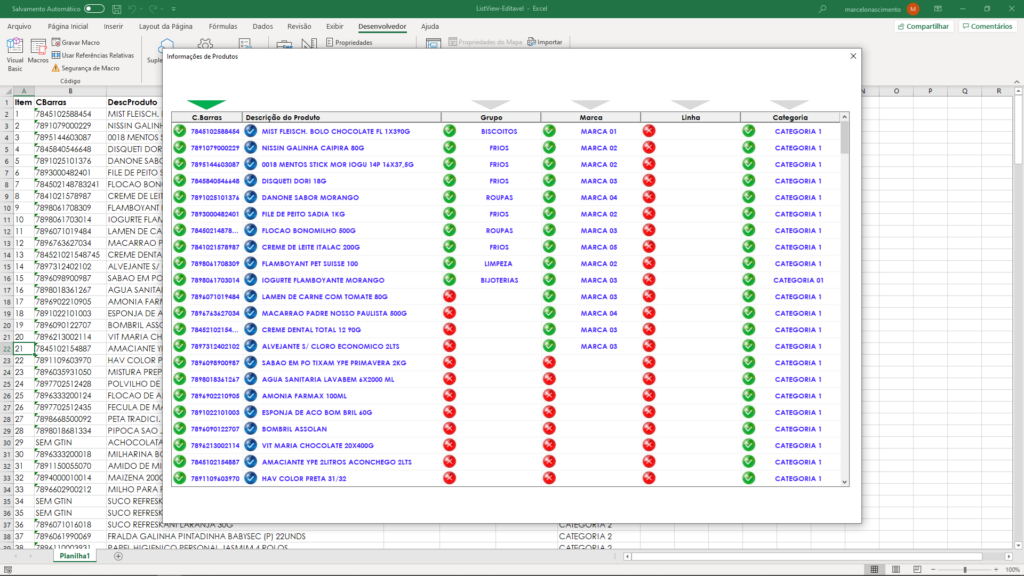
Ao executar a aplicação o seguinte projeto será exibido na tela.

Tornar ListView Editável (Editable ListView)
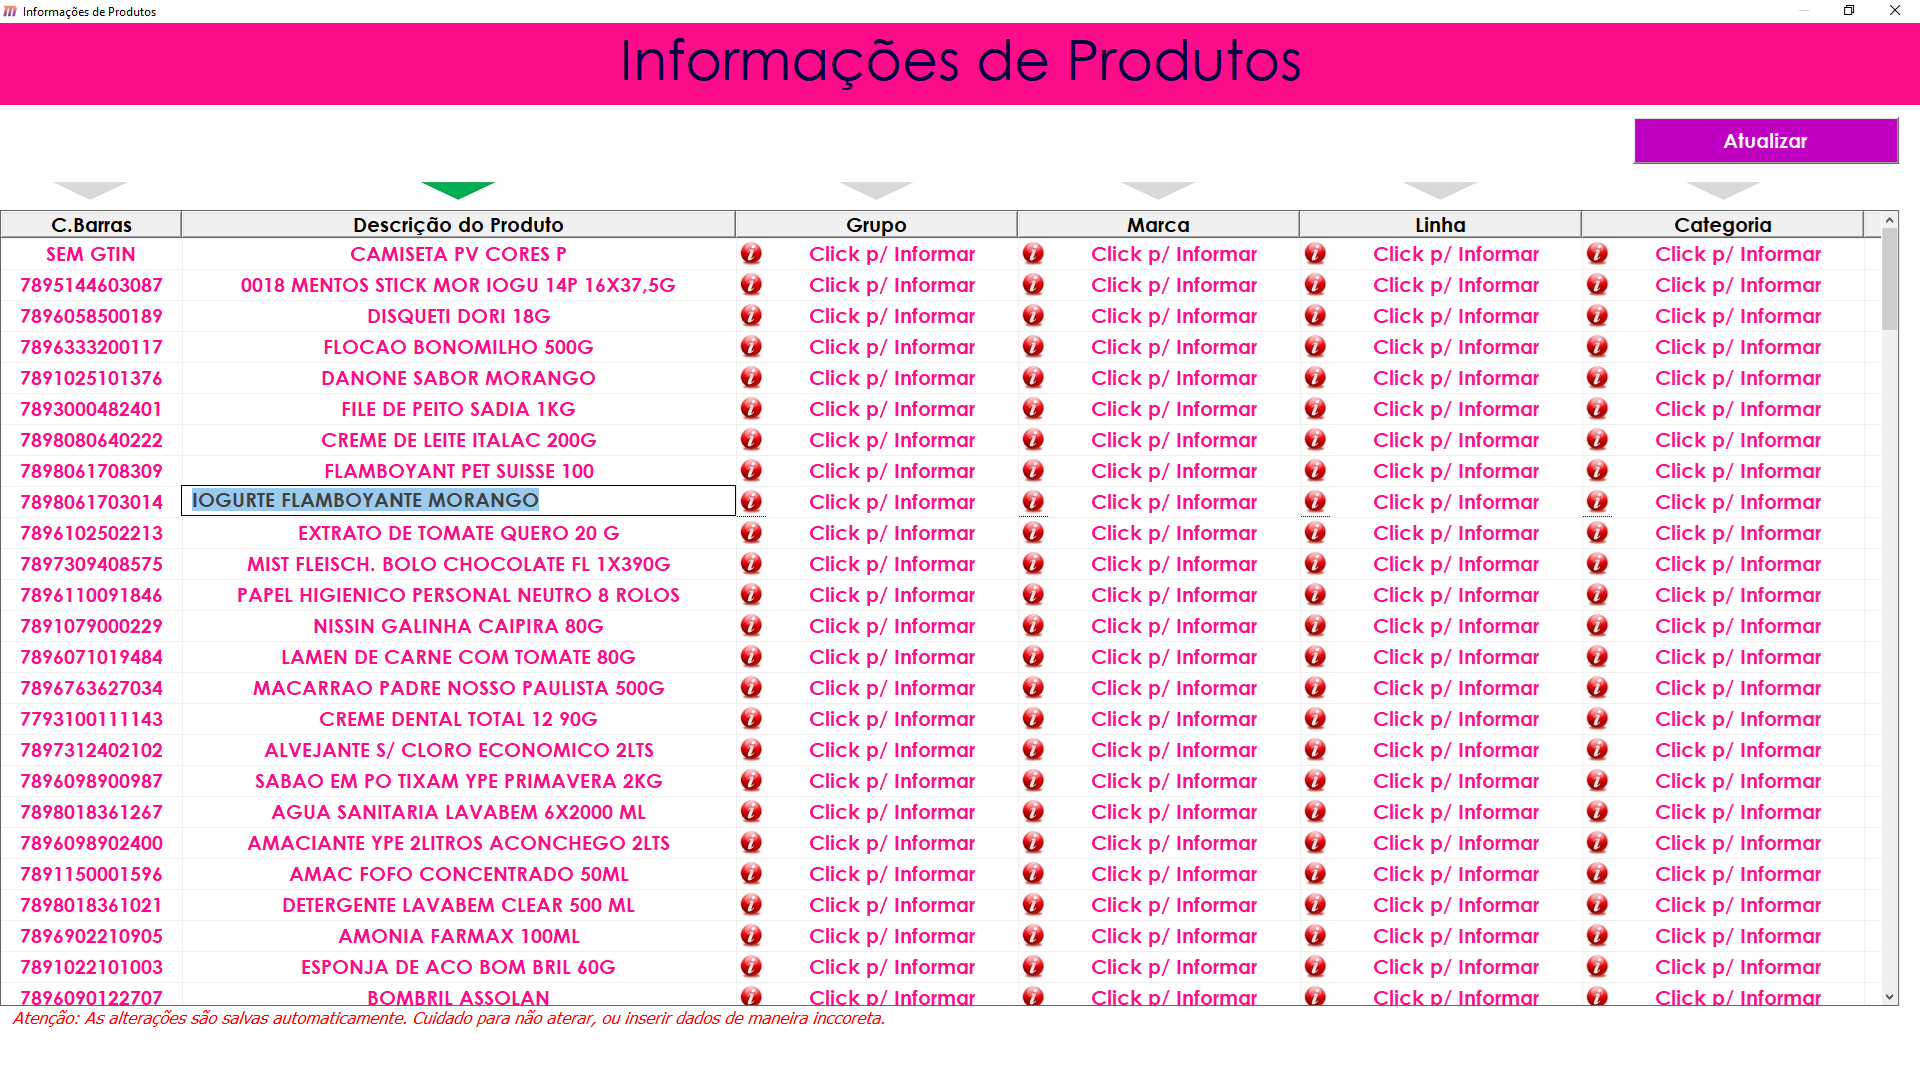
O evento que iremos utilizar para tornar o ListView Editável (Editable ListView) é o evento ListView1_DblClick(). Ou seja, ao dá um duplo click dentro do ListView será exibido um TextBox para inserção das informações ou dados desejados. Em outras palavras, você poderá digitar o texto desejado.
Por padrão, o controle ListView VBA não permite a edição de dados no modo lvReport, portanto para que possamos tornar esse controle editável, iremos criar um TextBox auto ajustável e auto dimensionável. Funcionará da seguinte forma, sempre que você der um duplo click dentro de um subitem do ListView VBA, o controle ListBox será alinhado e redimensionado as dimensões desse subitem.
Devido ao fato do controle TextBox não se sobrepor ao controle ListView, iremos também estar criando um controle do tipo Frame, pois esse sim, consegue se sobrepor ao Controle ListView. Nesse caso, inserimos o controle TextBox dentro do Controle Frame. Feito isso, já podemos escrever nosso código.
Private Sub ListView1_DblClick()

Dim i           As Integer
Dim ItemSel    As ListItem

If Not ListView1.SelectedItem Is Nothing Then
    Set ItemSel = ListView1.SelectedItem

    i = 2

    With Frame1

        .Visible = True
        .Top = ItemSel.Top + ListView1.Top
        .Left = ListView1.ColumnHeaders(i + 1).Left + ListView1.Left
        .Width = ListView1.ColumnHeaders(i + 1).Width
        .Height = ItemSel.Height

        .ZOrder msoBringToFront
    End With

    With txtEdit

        .Visible = True
        .Text = ItemSel.SubItems(i)
        .SetFocus
        .SelStart = 0
        .Left = 0
        .Top = 0
        .Width = ListView1.ColumnHeaders(i + 1).Width
        .Height = ListView1.SelectedItem.Height
        .SelLength = Len(.Text)
    End With
End If

End Sub

Private Sub ListView1_Click()
    Me.Frame1.Visible = False
    Me.txtEdit.Value = ""
    Me.infoCb.value = ""
End Sub
Note que o código acima permitirá que você edite os dados da coluna 2. Para tonar esse processo mais dinâmico e profissional, iremos criar novos recursos que permitira a edição de todas as colunas, para isso criamos alguns botões com o controle Label, e então escrevemos os dois códigos abaixo.
Sub AlinhaIcons()

Dim Cntr    As control
Dim v       As Integer

For v = 1 To ListView1.ColumnHeaders.Count

    For Each Cntr In UserForm1.Controls
            If TypeName(Cntr) = "Label" And Cntr.Name = Left(Cntr.Name, 8) & ListView1.ColumnHeaders(v).Index Then
                Cntr.Width = ListView1.ColumnHeaders(v + 1).Width
                Cntr.Left = ListView1.Left + ListView1.ColumnHeaders(v + 1).Left
                Cntr.Top = ListView1.Top - Cntr.Height
            End If
    Next Cntr

Next v
Set Cntr = Nothing

lblFoco.Left = lblZinza1.Left
lblFoco.Width = lblZinza1.Width
lblFoco.Top = ListView1.Top - lblFoco.Height

End Sub
Private Sub lblZinza1_Click()

    Dim vi      As Integer

    txtIndex.Value = 1
    vi = txtIndex.Value
    lblFoco.Left = Controls("lblZinza" & vi).Left
    lblFoco.Width = Controls("lblZinza" & vi).Width
    lblFoco.Top = Controls("lblZinza" & vi).Top
    Frame1.Visible = False
    txtEdit.Value = ""

End Sub

Private Sub lblZinza3_Click()

    Dim vi      As Integer

    txtIndex.Value = 3
    vi = txtIndex.Value
    lblFoco.Left = Controls("lblZinza" & vi).Left
    lblFoco.Width = Controls("lblZinza" & vi).Width
    lblFoco.Top = Controls("lblZinza" & vi).Top
    Frame1.Visible = False
    txtEdit.Value = ""

End Sub

Private Sub lblZinza4_Click()

    Dim vi      As Integer

    txtIndex.Value = 4
    vi = txtIndex.Value
    lblFoco.Left = Controls("lblZinza" & vi).Left
    lblFoco.Width = Controls("lblZinza" & vi).Width
    lblFoco.Top = Controls("lblZinza" & vi).Top
    Frame1.Visible = False
    txtEdit.Value = ""

End Sub

Private Sub lblZinza5_Click()

    Dim vi      As Integer

    txtIndex.Value = 5
    vi = txtIndex.Value
    lblFoco.Left = Controls("lblZinza" & vi).Left
    lblFoco.Width = Controls("lblZinza" & vi).Width
    lblFoco.Top = Controls("lblZinza" & vi).Top
    txtEdit.Value = ""

End Sub

Private Sub lblZinza6_Click()

    Dim vi      As Integer

    txtIndex.Value = 6
    vi = txtIndex.Value
    lblFoco.Left = Controls("lblZinza" & vi).Left
    lblFoco.Width = Controls("lblZinza" & vi).Width
    lblFoco.Top = Controls("lblZinza" & vi).Top
    txtEdit.Value = ""

End Sub
Salvar alterações da (Editable ListView) para Planilha
Por fim, escrevemos um código que salvará as alterações feitas no ListView VBA para dentro da Planilha do Excel automaticamente.
Sub EditaDados()

Dim lin         As Integer
Dim col         As Integer
Dim nValor      As String
Dim cod         As Long
Dim WPlan       As Worksheet
Dim R           As Range
Dim ItemSel    As ListItem

Set WPlan = Planilha1
Set ItemSel = ListView1.SelectedItem

On Error Resume Next


If txtIndex.Value = 1 Then

    If txtEdit.Value <> "" Then

        col = txtIndex.Value
        lin = ItemSel.Index
        ItemSel.SubItems(col) = txtEdit.Value
        cod = ListView1.ListItems(lin)
        nValor = ItemSel.SubItems(col)

        WPlan.Activate

        '------------------------------------------------------------------------------------------------
        With WPlan.Range("A:A")
            Set R = .Find(cod, LookIn:=xlValues, LookAt:=xlWhole)
                If Not R Is Nothing Then
                    R.Select
                    R.Offset(0, col).Value = nValor

                Else
                End If
        End With

        Set ItemSel = Nothing

    End If

End If


If txtIndex.Value >= 3 Then

    If infoCb.Value <> "" Then

        col = txtIndex.Value
        ItemSel.SubItems(col) = infoCb.Value
        lin = ItemSel.Index
        cod = ListView1.ListItems(lin).Text
        nValor = ItemSel.SubItems(col)

        WPlan.Activate

        '------------------------------------------------------------------------------------------------
        With WPlan.Range("A:A")
            Set R = .Find(cod, LookIn:=xlValues, LookAt:=xlWhole)
                If Not R Is Nothing Then
                    R.Select
                    R.Offset(0, col).Value = nValor

                Else
                End If
        End With

        Set ItemSel = Nothing

    End If

End If

Set WPlan = Nothing
Set ItemSel = Nothing

Frame1.Visible = False

End Sub
Private Sub ListView1_ColumnClick(ByVal ColumnHeader As MSComctlLib.ColumnHeader)

    With ListView1
        .SortKey = ColumnHeader.Index - 1
        If .SortOrder = lvwAscending Then
            .SortOrder = lvwDescending
        Else
            .SortOrder = lvwAscending
        End If
        .Sorted = True
    End With

End Sub
Por fim, escrevemos o código abaixo para classificar as colunas em ordem crescente ou de


Pingback: ListView com Gráfico de Barras usando Excel VBA - Projeto Aberto
Pingback: Sistema de agendamento de visitas com Excel VBA - Projeto Aberto
Caramba…. melhor conteúdo VBA que já busquei na internet. Já tem algum tempo que estou procurando exatamente isso e como foi dito no video no youtube não tem ainda. Parabéns ao desenvolvedor.
Sou iniciante em VBA. Consegui concluir todo o projeto… só não entendo pq não grava para a minha planilha. O resto está funcionando perfeitamente. Já vi e revi os dois videos varias vazes. No mais já me atendeu bastante.
Fato, como o amigo acima disse, conteúdo esplêndido… eu estou assistindo o teu vídeo faz três dias adaptando à necessidade da empresa onde estou atuando e vai dar super certo, incrível, parabéns continue assim que você vai longe
Já consultei informações com MVPs Microsoft Excel que não fizeram algo tão ‘mágico’ como o que vc fez aqui
Felicitaciones a esta pagina , de verdad,lo adecue en el proyecto de mi trabajo,esta funcionando,grande amigo Do Nascimento,exitos,Dios lo bendiga,es ud. un maestro.
Prezado, assim como os demais, funciona 99% – mesmo repetindo todos os passos não salva.
Coloquei uma msgbox para consultar o valor da variável “cod” e está vazia.
Fora isso, conteúdo excelente.
Boa noite, Freddie.
Sugiro acompanhar o vídeo, pois há umas alterações no código que não constam no blog.
O prof. Nascimento alterou a Sub ListView1_DblClick e fez chamada à Sub EditaDados nos componentes txtEdit e infoCb.
Espero ter ajudado.
Hola desde Colombia, agradezco inmensamente que compartas este tipo de conocimientos y a la vez felicitarle por la explicación de este trabajo aunque no es mi idioma, entiendo la explicación del video.
Só falta fazer o UPDATE da Listview quando altero “C.Barras” porque posso introduzir “SEM GTIN” e o icon devia fazer o update, de resto está fantástico
Muito bom o conteúdo.
Consegui fazer com que a coluna seja selecionada a partir do lugar do click e não sendo necessário clicar no label acima do listview. Segue o código de como fazer isso. No meu caso somente as colunas 4 a 7 podem ser alteradas e o label L_Coluna que tem o valor da coluna a ser alterada. Esse fator (53/40) foi por experiementação de qual o valor da posição x no click do mouse está na posição mais a direita da coluna do listview.
Private Sub LV_Ponto_MouseDown(ByVal Button As Integer, ByVal Shift As Integer, ByVal x As stdole.OLE_XPOS_PIXELS, ByVal y As stdole.OLE_YPOS_PIXELS)
Dim col1 As Long, col2 As Long, col3 As Long, col4 As Long, col5 As Long, col6 As Long, col7 As Long, col8 As Long
col1 = Me.LV_Ponto.ColumnHeaders(1).Width * (53 / 40)
col2 = col1 + Me.LV_Ponto.ColumnHeaders(2).Width * (53 / 40)
col3 = col2 + Me.LV_Ponto.ColumnHeaders(3).Width * (53 / 40)
col4 = col3 + Me.LV_Ponto.ColumnHeaders(4).Width * (53 / 40)
col5 = col4 + Me.LV_Ponto.ColumnHeaders(5).Width * (53 / 40)
col6 = col5 + Me.LV_Ponto.ColumnHeaders(6).Width * (53 / 40)
col7 = col6 + Me.LV_Ponto.ColumnHeaders(7).Width * (53 / 40)
col8 = col7 + Me.LV_Ponto.ColumnHeaders(8).Width * (53 / 40)
If x < col4 Then
Me.L_Coluna.Caption = 4
ElseIf x < col5 Then
Me.L_Coluna.Caption = 5
ElseIf x < col6 Then
Me.L_Coluna.Caption = 6
Else
Me.L_Coluna.Caption = 7
End If
End Sub